Many of the mouse issues and problems are due to dirt accumulated below the surface of the mouse. If the mouse is old, then due to environmental pollution and unclean surroundings, dirt can also accommodate inside the mouse. Cleaning the mouse regularly can help you avoid many of the mouse problems. Below steps will guide you through the process of cleaning a mouse and the things that are required.
Things that are required for cleaning a mouse :
- Cotton ball
- Toothpicks
- Rubbing alcohol
- Water
- Cotton like tissue paper or paper towel
- Hair dryer
Step 1 :
Gather all the things required and keep all the items nearby. Unplug the mouse from the computer and also remove the mouse pad. Turn your mouse over, so the bottom is facing up.
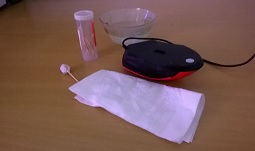
Things required to clean a mouse.
Step 2 :
Dip a cotton ball into rubbing alcohol. If rubbing alcohol is not available then plain water can also be used. There are thin rubbery points or “feet” at the bottom of the mouse. Clean each of the mouse’s little “feet”. These rubbery feet are many times covered with dirt and dust over a few days/weeks of use time.
You can use a toothpick to clean the area around these rubber feet. A lot of care needs to be taken while handling the mouse. Remember to clean the tip of the foot as well as it will also have dirt and dust, as the most-important portion of this process.
Step 3 :
If optical mouse, then clean the center “eye” of the mouse with another cotton ball. Make sure you use separate cotton ball and do not reuse the previous one. Make sure to get into the groove of the eye. Do not press too hard or rub on the eye too much, as this will scratch the eye, and cause the shield to shatter over-time. A few light strokes will effectively clean this mouse, and keep it working.
If its a ball mouse, then there will be a ring around the ball. Turn the ring surrounding the ball counter-clockwise to remove the ring. Remove the ball and clean with a damp cloth. Use a cotton ball or a toothpick to clean the three rollers located underneath the ball inside the mouse. If you use a damp cotton ball, ensure no water drips from the ball into the mouse. If using a toothpick, make sure you are gentle enough and no pieces of wooden stick are breaking.
Step 4 :
Use a cotton-like paper towel, soaked in water to clean the rest of the bottom of the mouse.
Step 5 :
After cleaning, even if it will not take a long time for mouse to dry , however it is a good idea to use a hair dryer to dry the bottom of the mouse. This is to ensure that there is no excess moisture or water inside the mouse.
Step 6 :
After drying, if ball mouse, then place the ball in the circle and turn the ring clockwise to fix the ball in its position.
Step 7 :
Take another toothpick and clean the groove in between the two or three mouse buttons. Do not press too hard, as pieces of the wooden toothpick will break and can cause the mouse to falter.
Clean the mouse-wheel using toothpicks around the edges, along with the exterior of the mouse-wheel itself. Wipe from left to right.
Just blow some air with your mouth in between the small gap present below the left and right clicks. You can use a hair dryer, however make sure that the air is not very hot and not with too much force.
Step 8 :
After cleaning the mouse, it is very essential that the mouse pad (if being using) also be cleaned. A dusty mouse pad can also amount to a lot of mouse issues. Clean the mouse pad with another paper towel and water. Clean the cord (if a cord is present) of the mouse with the help of a wet cloth. Rub the cord from the mouse all the way towards the cord’s end.
Place the mouse and mouse pad at the normal position at your desk and now you are ready to connect the mouse to the computer. It is advisable to clean the mouse atleast once in 2 weeks for optimal use.